I Like to Move it Move it: Adding Motors to the Makey:bit

30-60 min

Ages 11+

What Will You Make?

Learn how to control servo motors with the micro:bit then build a small buggy for the Makey:bit.

What Will You Learn?

Learn how to install and control Servo motors with the Makey:bit.

Learn how to install Extensions in MakeCode.

Learn how to use Function blocks in MakeCode.

Connect the Servo Motors

Step 1

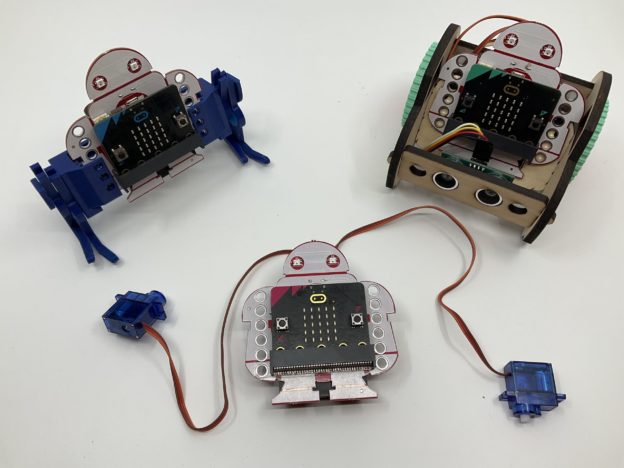
Look on the back of the Makey:bit at the array of pins behind the head. On the left side of the array, there are two rows of 3 pins dedicated to servo motors. The top row is labeled (left to right) P2 Servo, BAT and GND. The second row is labeled P0 Servo, BAT, GND.

Step 2

Insert your servo motors into each row with the orange wire to the left (into P0 or P2).

Add the Servo Motor extension

Step 1

Servo motors can be controlled using the Pins blocks but it is easier to control them if you add the Servo Extension. In your MakeCode program, click on Extensions.

Step 2

Select the Servo extension (if it is not visible on the first page, search for Servo).

Test Out Some Code

Step 1

Before you build something, try out some simple code to familiarize yourself with how to control the motor. From the “Input” tab, select “on button A pressed.”

Step 2

Now select from the servos tab and pick a “continuos servos” block. Put two of these blocks into the Input tab and select one from P0 and the other from P2.

Step 3

Select a “pause” block from the “Basic” tab.

Step 4

Select a “Stop servo” block from the “Servos” tab and use two of them to stop the servo.

Step 5

Upload the program and test it out

Build Something!

Step 1

Robots come in many shapes and sizes. Build your own or pick one of the projects designed specifically for the Makey:bit: Walking Robot or Robot Buggy.
Follow the assembly instructions for the project you pick. 

Step 2

Once assembled, take a close look at the position of the motors in your robot. Notice that they are mirroring each other. Almost any robot design will have the two motors positioned as mirror images of each other. What does that mean for your code? You probably guessed it… forward for one motor means reverse for the other motor! Update your code and test it out.

Build Something!

Step 1

Now that we know how to control motors and LEDs on the micro:bit and the eyes, we can use Functions to streamline our code for commonly used commands. In this case, let’s create a command for the robot that we will call “goForward”. Start by clicking on the “Advanced” tab.

Step 2

Now select the “Functions” tab and click on “Make a Function.”

Call the function “goForward.”

Note: It is common naming convention for Functions to start with a lower case letter. This isn’t a requirement in MakeCode but we will use this convention.

Step 3

Now we can combine code within the Function block “goForward.” Let’s add a face that represents going forward. We can also make the colors of the eyes green to represent “goForward” and, of course, let’s make the motors turn in such a way that the robot goes forward.

Test and upload the code.

Step 4

Now try making a “goRight” and a “goLeft” block or even a “goBackwards” block.

What Is Happening Here?

What is a Servo Motor?

According to Wikipedia “A servomotor is a closed-loop servomechanism that uses position feedback to control its motion and final position. The input to its control is a signal (either analogue or digital) representing the position commanded for the output shaft.”

What does this mean? Essentially, a servo motor is a precise motor that is often used in robotics. There are two types of servo motors: continuous and 180. A continuous motor can spin forward and backward continuously and is most commonly used for wheels of a robot. A 180 motor can only move 180 degrees and is used when we want to have very precise control.

Servo motors come in many shapes and sizes and the most commonly used size for beginner maker projects are “micro-servo motors.” If the servo is marked “FS90R” it is a continuous servo. If you are unsure what kind of servo you have, look up online the part number marked on the servo to confirm before proceeding

About the Makey:bit

The Makey:bit Adventure Board is the perfect way to get started with microcontrollers. With this exclusive Maker Shed kit, you’ll be able to easily launch into the world of electronics and create amazing projects.

This all-in-one board includes everything you need to get started, including a built-in LED, buzzer, and various sensors. Plus, the Makey:bit is compatible with all kinds of additional modules, so you can easily expand your creativity.

So what are you waiting for? Get the Makey:bit Adventure Board today and start supercharging your microcontrollers!

Are you looking for a way to supercharge your microcontrollers? If so, then you need the Makey:bit Adventure Board! This exclusive Maker Shed product is packed with features that will take your microcontrollers to the next level. With the Makey:bit, you’ll be able to launch into the realm of microcontrollers and unleash their full potential. The Makey:bit is loaded with features that make it an essential tool for anyone looking to get the most out of their microcontrollers.

Start Here: Bring Makey Alive with a Beating Heart

less than 30 min

Ages 11-13

What Will You Make?

Make a simple “beating heart” animation using the grid of LED lights on the front of the micro:bit board.

What Will You Learn?

The Flashing Heart shows you how to write and upload your first program to the micro:bit using free, online Microsoft MakeCode software. It’s based on the tutorial on the micro:bit web site at https://makecode.microbit.org/ This version adds a few steps, so you can move along in your coding adventure quicker!

Prepare the Makey:bit

Step 1

Insert the batteries into the back of the Makey:bit. Make sure the batteries are facing the right in the correct direction.

Step 2

Now insert the micro:bit in the front holder, with the buttons facing out.

Step 3

Turn on the Makey:bit with the red on/off switch in the back.

Step 4

Extra! If this is a brand-new micro:bit, it should have a fun little pre-loaded program that which provides a guided tour of the micro:bit. Turn on the Makey:bit with the red on/off switch in the back and take a few minutes to follow the directions and play around with the board.

Write Your Code

Step 1

The micro:bit can be programmed in multiple programming languages including micro Python and the Arduino IDE, but the easiest way to program it is with Microsoft MakeCode. Go to https://makecode.microbit.org/ to get started.

Step 2

Open a new project on the micro:bit MakeCode website (https://makecode.microbit.org/). You’ll see a column of different categories of blocks.

Step 3

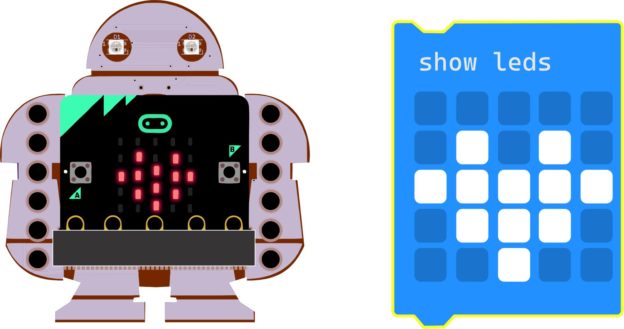
Click on Basic. When the menu of blocks in the Basic category opens, click on the “show LEDs” block and drag it into the workspace. This block lets you turn the micro:bit’s LEDs on and off. Click on the little boxes to draw a heart with lights.

Step 4

When you’re done, drag the “show leds” block inside the “forever” block that’s already in the workspace.

Upload the Program

Step 1

Insert the USB cable into the micro:bit, click the Download button, and follow the instructions to download the program to the board. The lights you selected on your board should light up.

Make the Heart Beat

Explaination

What if we want to make the heart look like it’ is beating? We can do that the same way cartoon animators make things look like they’re moving: by replacing the image with a slightly different one. If you switch them quickly enough, your brain thinks it’s watching an object moving or changing shape! In this case, we’ll go back and forth between two versions of the heart image.

Step 1

First, add another “show LEDs” block underneath the first. On the micro:bit simulation on the screen, you’ll see the heart drawing flash on and off.

Next, let’s draw a slightly different heart in the second “show LEDs” block.

Step 2

Use the “pause” block between the multiple “show LEDs” blocks to slow down the transition and animate the image.

Step 3

Let’s make it look like it is pulsing over and over. We do this by putting it inside a “forever” loop.

When the micro:bit simulation on the screen reloads, the image will start to pulse!

Step 4

Finally, don’t forget to download the program to see how it works on the actual micro:bit board.

What Is Next?

Explore Animation

Now that you have figured out how to animate a flashing heart, what else can you add to the makey:bit?

Can you design an animated animal or face? Here are some ideas https://microbit.org/projects/make-it-code-it/animated-animals/. Make your own and animate it.

Explore other blocks that control the LED screen. What does the “show string” block do? The “show arrow” block uses an onboard sensor. Which sensor do you think it is using?

Build some code using two different blocks not covered in this tutorial.

About the Makey:bit

The Makey:bit Adventure Board is the perfect way to get started with microcontrollers. With this exclusive Maker Shed kit, you’ll be able to easily launch into the world of electronics and create amazing projects.

This all-in-one board includes everything you need to get started, including a built-in LED, buzzer, and various sensors. Plus, the Makey:bit is compatible with all kinds of additional modules, so you can easily expand your creativity.

So what are you waiting for? Get the Makey:bit Adventure Board today and start supercharging your microcontrollers!

Are you looking for a way to supercharge your microcontrollers? If so, then you need the Makey:bit Adventure Board! This exclusive Maker Shed product is packed with features that will take your microcontrollers to the next level. With the Makey:bit, you’ll be able to launch into the realm of microcontrollers and unleash their full potential. The Makey:bit is loaded with features that make it an essential tool for anyone looking to get the most out of their microcontrollers.
Makey:bit Cereal Box Plotter

1-3 hours

Ages 8+

What Will You Make?

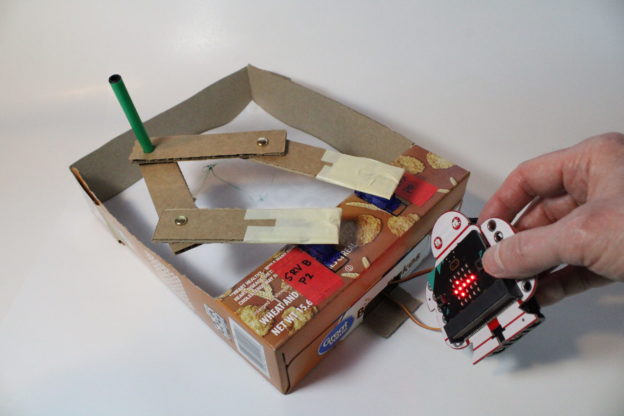
In this project, you will create a programmable drawing robot, also called a plotter. The Makey:bit and the micro:bit control two servos, which make the arms move around. The micro:bit’s accelerometer lets you use the Makey:bit as a tilt controller and tell the plotter to draw back and forth and side to side across the paper!

What Will You Learn?

You’ll learn to use the input from an accelerometer to control servos with MakeCode and a micro:bit.

Prep the Base

Step 1

The base of the plotter is a folded-over ridge of cardboard that holds the servos, and a flat surface that holds the drawing paper. Cereal box cardboard has a coating on the outside that prevents the marker from soaking through. To make it out of a sheet of cardboard, fold the end of a rectangle over twice and tape it as shown.

Step 2

To make the plotter base out of a cereal box, lay the box down on its back. Draw a line across the box about 2 inches up from the bottom. Press hard. Draw another line about 2 inches above the first.

Step 3

Cut one top edge of the box from the opening at the top to the first line. Repeat with the other edge. This will turn the front of the box into a flap you can fold back.

Step 4

Fold the flap up along the second line. Then fold it down along the first line. Press the rest of the flap into the bottom of the box so it lays flat. If you want, trim the other end of the box to fit around the flap. Tape everything in place.

Insert the Servos

Step 1

Place the servos on the stand, trace around them, and cut out the shapes. 

Step 2

Cut a hole in the back of the box. Insert the servos into the hole on top. Pull the servo cables out through the hole in the back.

Step 3

To calibrate the servos so they face front when set at neutral (90 degrees), follow these steps with each one:

  1. Attach a servo horn with an arm facing straight ahead. 
  2. Gently turn the servo horn all the way to the right, as far as it will go. If the arm is not pointing to the right (3 o’clock position), then remove the servo horn and snap it back on in the correct position. 
  3. Turn the servo so the arm points straight ahead again.

Make the Arms

Step 1

Cut four strips of sturdy cardboard, about 1 inch wide by 4 or 5 inches long.

Step 2

Connect the ends of two strips with a brad. Use the sharp pencil to make a starter hole if needed. You now have an arm that bends at the “elbow.” Repeat with the other two strips.

Step 3

Take the end of one arm and overlap it with the end of the other arm. To make a holder for the marker, poke the sharp pencil through both layers of cardboard.

Step 4

Insert the marker through both layers of cardboard. With the cap end of the marker facing down, play around with the ends of the arms. See how you can move them to make the pen go in different directions.

Step 5

Tape the loose ends of the arms securely to the servo horn.

Step 6

Test it with some paper cut down to fit inside the box. See where the marker goes to the right, left, front and back of the box.

Connect the Makey:bit to the Servos

Step 1

Insert the micro:bit into the Makey:bit.

Step 2

Plug the cable wires for one servo over the pins marked SRVA. Write P0 next to the servo.

Step 3

Plug the cable wires for the other servo over the pins marked SRVB. Write P2 next to the servo.

Step 4

Use the data cable to connect the micro:bit to your computer and get ready to code!

Coding Instructions

Sample Code

Sample Plotter Code https://makecode.microbit.org/_XMd1evDoHfMm 

Code the arms to move in the direction you tilt the Makey:bit. 

NOTE: Only move the servo(s) a little way to the right or left. This will help you avoid jerking the plotter arms around too far and damaging the cardboard or the electronics. If needed, increase the movement in small steps until you reach the amount you want.

Coding micro:bit

  1. On start, set the servos to 90 degrees (neutral position).
  2. From Input, grab the “on shake” block.
  3. Open the drop-down menu and choose “tilt left.” 
  4. Add a stack of blocks to make the servos turn left.
  5. Download and test your code. 
  6. When it’s correct, duplicate the stack and  change everything to turn to the right.
  7. Add comments to remember what your code does!

About the Makey:bit

The Makey:bit Adventure Board is the perfect way to get started with microcontrollers. With this exclusive Maker Shed kit, you’ll be able to easily launch into the world of electronics and create amazing projects.

This all-in-one board includes everything you need to get started, including a built-in LED, buzzer, and various sensors. Plus, the Makey:bit is compatible with all kinds of additional modules, so you can easily expand your creativity.

So what are you waiting for? Get the Makey:bit Adventure Board today and start supercharging your microcontrollers!

Are you looking for a way to supercharge your microcontrollers? If so, then you need the Makey:bit Adventure Board! This exclusive Maker Shed product is packed with features that will take your microcontrollers to the next level. With the Makey:bit, you’ll be able to launch into the realm of microcontrollers and unleash their full potential. The Makey:bit is loaded with features that make it an essential tool for anyone looking to get the most out of their microcontrollers.

FEEDBACK