Makeybit-with-small-heart

Start Here: Bring Makey Alive with a Beating Heart

less than 30 min

Ages 11-13

What Will You Make?

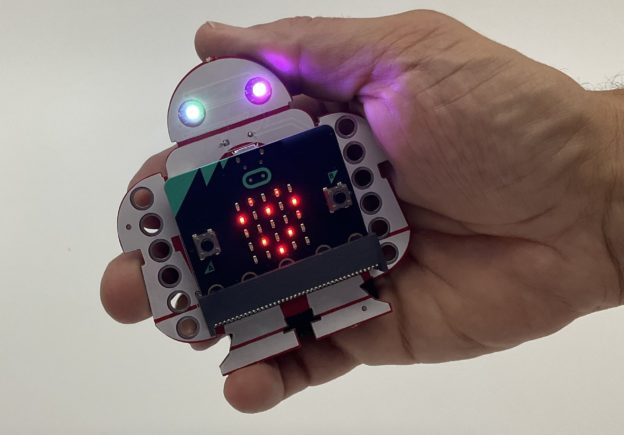
Make a simple “beating heart” animation using the grid of LED lights on the front of the micro:bit board.

What Will You Learn?

The Flashing Heart shows you how to write and upload your first program to the micro:bit using free, online Microsoft MakeCode software. It’s based on the tutorial on the micro:bit web site at https://makecode.microbit.org/ This version adds a few steps, so you can move along in your coding adventure quicker!

Prepare the Makey:bit

Step 1

Insert the batteries into the back of the Makey:bit. Make sure the batteries are facing the right in the correct direction.

Step 2

Now insert the micro:bit in the front holder, with the buttons facing out.

Step 3

Turn on the Makey:bit with the red on/off switch in the back.

Step 4

Extra! If this is a brand-new micro:bit, it should have a fun little pre-loaded program that which provides a guided tour of the micro:bit. Turn on the Makey:bit with the red on/off switch in the back and take a few minutes to follow the directions and play around with the board.

Write Your Code

Step 1

The micro:bit can be programmed in multiple programming languages including micro Python and the Arduino IDE, but the easiest way to program it is with Microsoft MakeCode. Go to https://makecode.microbit.org/ to get started.

Step 2

Open a new project on the micro:bit MakeCode website (https://makecode.microbit.org/). You’ll see a column of different categories of blocks.

Step 3

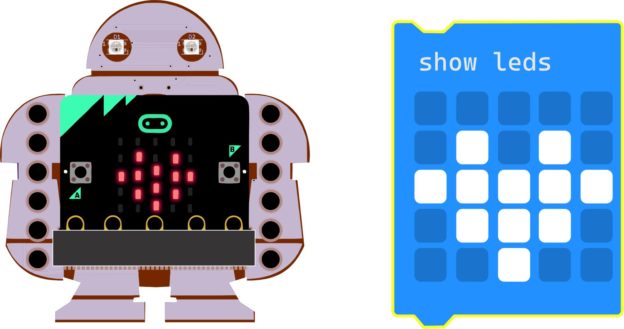
Click on Basic. When the menu of blocks in the Basic category opens, click on the “show LEDs” block and drag it into the workspace. This block lets you turn the micro:bit’s LEDs on and off. Click on the little boxes to draw a heart with lights.

Step 4

When you’re done, drag the “show leds” block inside the “forever” block that’s already in the workspace.

Upload the Program

Step 1

Insert the USB cable into the micro:bit, click the Download button, and follow the instructions to download the program to the board. The lights you selected on your board should light up.

Make the Heart Beat

Explaination

What if we want to make the heart look like it’ is beating? We can do that the same way cartoon animators make things look like they’re moving: by replacing the image with a slightly different one. If you switch them quickly enough, your brain thinks it’s watching an object moving or changing shape! In this case, we’ll go back and forth between two versions of the heart image.

Step 1

First, add another “show LEDs” block underneath the first. On the micro:bit simulation on the screen, you’ll see the heart drawing flash on and off.

Next, let’s draw a slightly different heart in the second “show LEDs” block.

Step 2

Use the “pause” block between the multiple “show LEDs” blocks to slow down the transition and animate the image.

Step 3

Let’s make it look like it is pulsing over and over. We do this by putting it inside a “forever” loop.

When the micro:bit simulation on the screen reloads, the image will start to pulse!

Step 4

Finally, don’t forget to download the program to see how it works on the actual micro:bit board.

What Is Next?

Explore Animation

Now that you have figured out how to animate a flashing heart, what else can you add to the makey:bit?

Can you design an animated animal or face? Here are some ideas https://microbit.org/projects/make-it-code-it/animated-animals/. Make your own and animate it.

Explore other blocks that control the LED screen. What does the “show string” block do? The “show arrow” block uses an onboard sensor. Which sensor do you think it is using?

Build some code using two different blocks not covered in this tutorial.

About the Makey:bit

The Makey:bit Adventure Board is the perfect way to get started with microcontrollers. With this exclusive Maker Shed kit, you’ll be able to easily launch into the world of electronics and create amazing projects.

This all-in-one board includes everything you need to get started, including a built-in LED, buzzer, and various sensors. Plus, the Makey:bit is compatible with all kinds of additional modules, so you can easily expand your creativity.

So what are you waiting for? Get the Makey:bit Adventure Board today and start supercharging your microcontrollers!

Are you looking for a way to supercharge your microcontrollers? If so, then you need the Makey:bit Adventure Board! This exclusive Maker Shed product is packed with features that will take your microcontrollers to the next level. With the Makey:bit, you’ll be able to launch into the realm of microcontrollers and unleash their full potential. The Makey:bit is loaded with features that make it an essential tool for anyone looking to get the most out of their microcontrollers.

Makey:bit Brand New Eyes!!

less than 30 min

ages 11-13

What Will You Make?

This project shows how to control the color of the Makey:bit’s eyes and write a program to randomly change the eye color every time you shake the Makey:bit + micro:bit.

What Will You Learn?

Learn how to control the Makey:bit eyes by learning about programmable, addressable LEDs controlled by the NeoPixel driver.

Learn how to install Extensions in MakeCode.

Learn how to use math blocks in MakeCode.

What are the Makey:bit eyes?

Neopixels

The eyes of the Makey:bit are NeoPixel-compatible Light Emitting Diodes (LED) that can be individually programmed. Each eye has a Red, Green and Blue (RGB) LED and the brightness and intensity of each color can be controlled through code. Multiple Neopixels can also be put together on a strip or grid and can be individually controlled based on the order they are on the strip (starting with 0 through however many NeoPixels we have).

Adding NeoPixel Extension

Step 1

Neopixels are not standard with every micro:bit so first step is to add the blocks needed to control them in MakeCode. In programming, blocks of code that are used for a specialized purpose are often called “drivers” or “libraries.” In MakeCode, we can add new drivers and libraries by going to a section called “Extensions.”

Step 2

Open your beating heart program in MakeCode. Click on the “Advanced” tab in the code blocks section.

Step 3

Scroll to the bottom of the blocks and click on “Extensions”

Step 4

On the top row there is a square for the Neopixel drivers, click on it.

Program the Eyes

Step 1

Now you should be back in the MakeCode programming environment and a new tab should be visible called “Neopixel”.

Step 2

First you have to tell the micro:bit that NeoPixels are connected to it. Click on the Neopixel tab and drag the “set strip…” block to the “on start” block. On the Makey:bit, the NeoPixels are connected to pin 16 so select P16 and since there are two eyes, select “2” LEDs.

Step 3

NeoPixels are very bright when on full (default) so it is recommended to use the “set brightness” block to set the brightness to roughly half (they can go from 0-255 so 100 is a good starting point).

Step 4

Now that the micro:bit knows that there are NeoPixels connected. Let’s turn on the colors. Use the “strip set pixel color…” block and put it inside the forever loop.

Remember, the NeoPixels start at 0 so even though there are two Neopixels, the first one (left) is “0” and the second one (right) is “1”.

Don’t forget to use the “show” block otherwise nothing will happen.

Step 5

Upload the program.

Random Color Generator

Step 1

Neopixels make colors by combining red, green and blue.

On the “more” menu of the Neopixels tab, there’s a block that lets us make our own colors by combining them ourselves.

In this block, 0 is “off” and 255 is maximum brightness. When all are at 255, the color looks white. When only one color is on, the color is that color… etc.

You can drag this block where the color name is currently showing and make your own colors by changing the values directly.

Step 2

If you want to explore how many colors the NeoPixels can make, you could do it manually but that would take a long time. Instead, let’s explore an alternative approach.

Step 3

Now is a good time to explore the “Math” blocks. Click on that tab and select the the “Random” block.

If you put in a random number between 0-255 into the value, now, every time the heart beats, a new random number and color will appear.

Upload the code and observe how the Makey:bit functions.

Sample Code

Link to MakeCode: https://makecode.microbit.org/_6k7dUThyPLo2

Note: In the sample code there’s an additional math step where we pick a random number between 1-25 and then multiply the number by 10… Can you guess why that was done?

What Is Happening Here?

Intro to Makey:bit

This is an introductory programming project for the Makey:bit that explains how to add extensions and program features of the Makey:bit.

This is also an introductory project to explore how colors are most commonly generated in most computer screens, through a combination of “RGB” (Red, Green and Blue) Lights. The Makey:bit eyes are RGB LEDs and the final code will generate thousands of different colors by changing the level of Red, Green or Blue in the eyes.

About the Makey:bit

The Makey:bit Adventure Board is the perfect way to get started with microcontrollers. With this exclusive Maker Shed kit, you’ll be able to easily launch into the world of electronics and create amazing projects.

This all-in-one board includes everything you need to get started, including a built-in LED, buzzer, and various sensors. Plus, the Makey:bit is compatible with all kinds of additional modules, so you can easily expand your creativity.

So what are you waiting for? Get the Makey:bit Adventure Board today and start supercharging your microcontrollers!

Are you looking for a way to supercharge your microcontrollers? If so, then you need the Makey:bit Adventure Board! This exclusive Maker Shed product is packed with features that will take your microcontrollers to the next level. With the Makey:bit, you’ll be able to launch into the realm of microcontrollers and unleash their full potential. The Makey:bit is loaded with features that make it an essential tool for anyone looking to get the most out of their microcontrollers.
FEEDBACK